Showing posts with label preschool. Show all posts
blogger

Tuesday, January 20, 2015

Preschool Storytime: Owls

I. Love. Owl. Storytime. Between the plethora of resources, the adorable owl crafts and the way that even my youngest kiddos enthusiastically say, "Hooooooot," it's easily one of my favorites.

The owl books are so popular that when I shot the photo for this post, a number of the books that had been included in the Owl Storytime had already been checked out by excited little readers.
 
My top picks for owl books are:
 
Little Hoot by Amy Krouse Rosenthal and Jen Corace
Little Owl Lost by Chris Haughton
Good Night, Owl by Pat Hutchins
Owl Babies by Martin Waddell and Patrick Benson
Owl Moon by Jane Yolen and John Schoenheer (for older audiences)
The Owl and the Pussycat by Edward Lear and Jan Brett
 
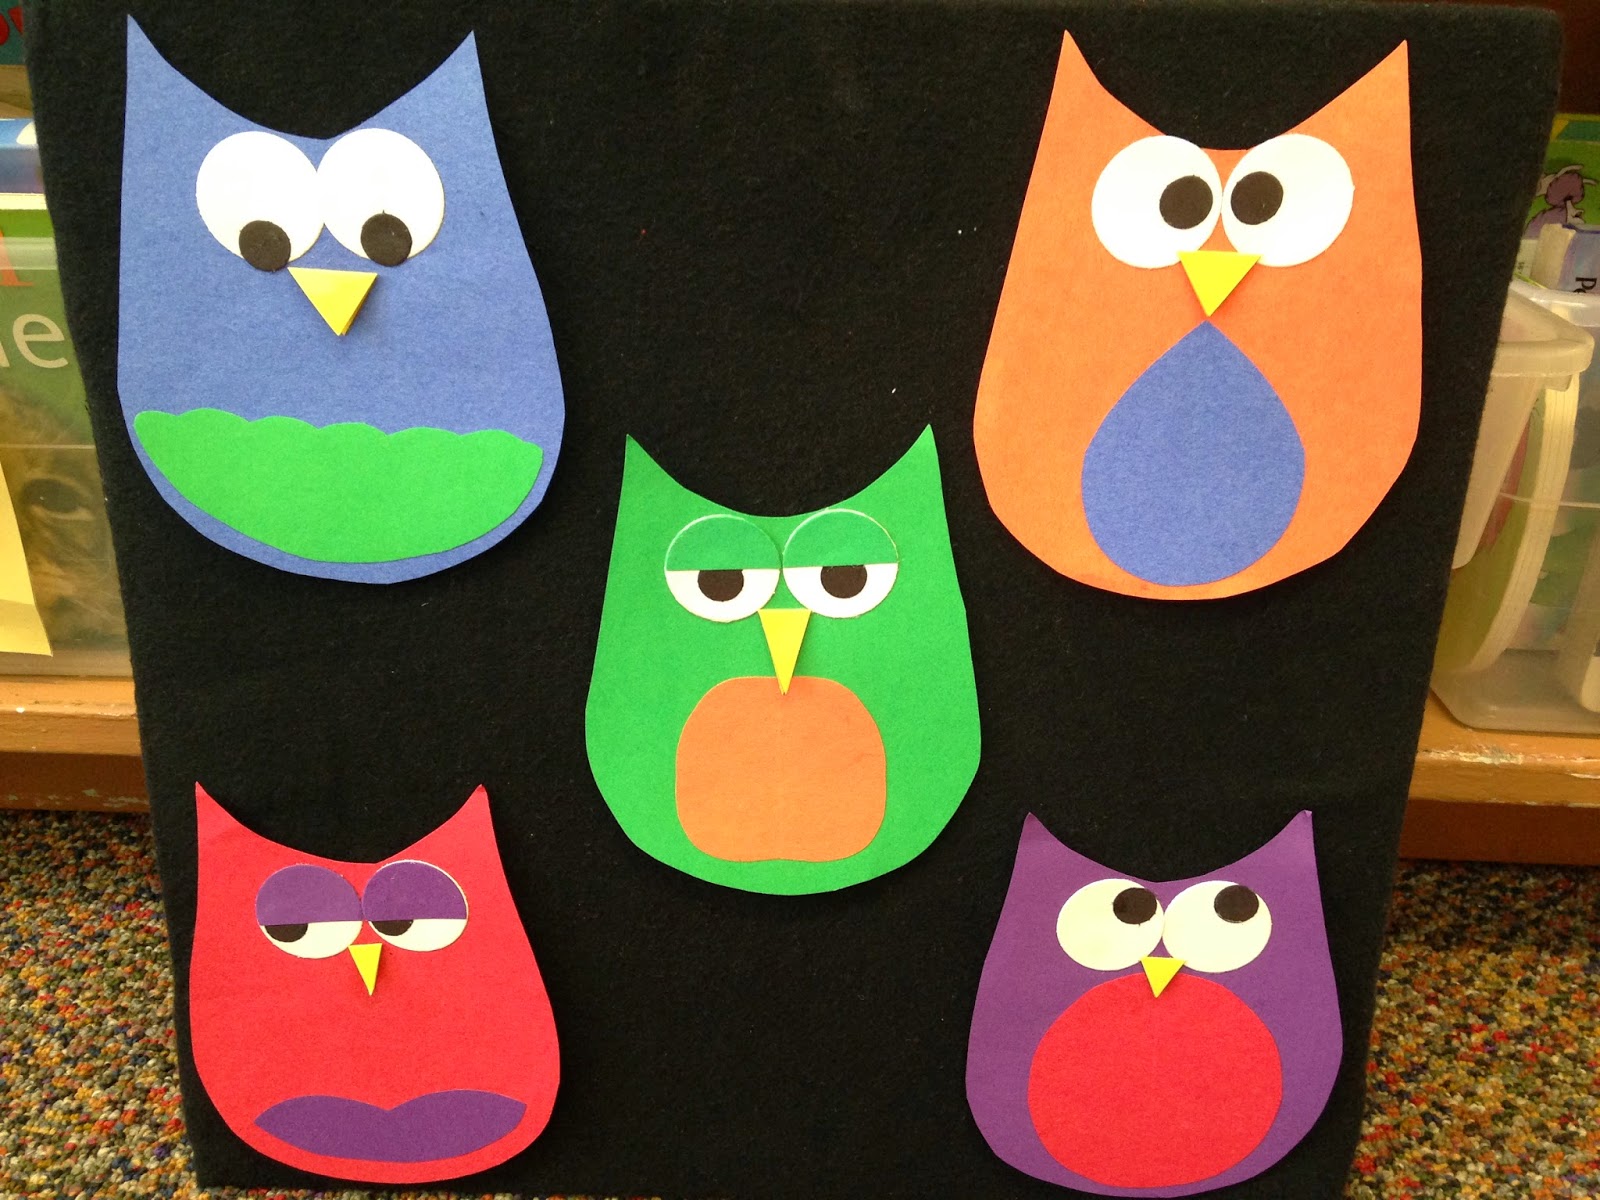
Today's felt board rhyme came from Leah and Mollie over at Sunflower Storytime, their "What a HOOT" storytime post is adorable.
 
Five Little Owls
Five little owls sitting in a tree
One flew away! How many do you see?
One, two, three, four.
 
Four little owls sitting in a tree
One flew away! How many do you see?
One, two, three.
 
Three little owls sitting in a tree
One flew away! How many do you see?
One, two.
 
Two little owls sitting in a tree
One flew away! How many do you see?
One.
 
One little owl sitting in a tree
 She flew away! How many do you see?
 Zero!
 This was a big hit!
 
Before the kiddos left, they made these adorable (and very easy) owl handprints. Once the handprints dried, my lovely library assistant and I added the darling details. I am in love with these! I was also thrilled to discover that I could feed construction paper through the printer and would be able to add the titles of the books for our parents to reference.

blogger

Monday, November 24, 2014

Preschool Storytime: Thanksgiving

This week's storytime post comes as both a sharing to fellow librarians and an instructional tutorial to families. Never have I sent a craft home as an extension activity, but this week the craft was too cute and the amount of time was too short.

This morning a parent came in to look for a particular non-fiction book and left saying, "I'm just so impressed. It's a relatively small library and I'm leaving with three books on this very particular topic." It was a proud librarian moment. The pride then continued when I went to look through the Thanksgiving bin and found more fun titles than I expected. I did pick up a few new(er) titles and ended up with the following for storytime:

I Know an Old Lady Who Swallowed a Pie by Alison Jackson and Judy Schachner
10 Fat Turkeys by Tony Johnston and Rich Deas
Bear Says Thanks by Karma Wilson and Jane Chapman
The Amazing Turkey Rescue by Steve Metzger and Jim Paillot

The Almost Unschooling Mom posted a fun brown paper bag puppet to accompany I Know an Old Lady Who Swallowed a Pie and I was hooked. Like the Almost Unschooling Mom, I used Marcia's Lesson Links for the body, Utah Education Network's Old Lady Puppet for the head (I like that the mouth is bigger and the kiddos can fit the cards in easily), and Make Learning Fun for the pieces of food.
We finished our storytime with I Know an Old Lady Who Swallowed a Pie and as I was reading, the kiddos brought up the different pieces of food and dropped them in the old lady's mouth. Too much fun. They loved being part of the story.

To make your own Old Lady puppet at home, follow these steps:
Step One: Color the Old Lady and the pieces of food.

Step Two: Cut the Old Lady (including inside her mouth, big people help will be required here) and the pieces of food. I cut the rectangle outline of the food so they were all the same size and shape.

Step Three: Lay the paper bag on the table with the seam of the bottom of the bag, face up. Glue the Old Lady's face to the bottom of the bag. I suggest using a glue stick for this part, anything else will soften your brown paper bag.

Step Four: Glue the Old Lady's body to the bag, make sure your hand can still fit inside the bag and the seams all move.

Step Five: Here comes the tricky part... Use a scissors to cut out the mouth of the Old Lady, I used tape to reinforce her mouth to the bag.
Step Six: This step is option, you can tape the plastic sandwich bag inside of the brown paper bag to catch the pieces of food.

Step Seven: Retell the story and enjoy!


blogger

Sunday, September 7, 2014

Library Menagerie

The library menagerie is constantly growing...

They brighten our spirits, make wonderful reading buddies, create perfect opportunities to connect with hesitant little ones, and bring already fun stories to life.


I have known about Jellycat for a few years now and my wish list of Jellycat critters to be added to the menagerie is constantly growing. I have been hinting to my husband about these creatures, in particular, for some time now...

Oh, the possibilities of storytime fun...

If you don't have a fluffy zoo in your library yet, I would highly suggest it. It opens opportunities and connections I would never have dreamt possible.

blogger

Thursday, August 14, 2014

Updated! Shark Week Storytime

A few weeks back I planned to do an ocean-themed storytime to go with my Reader's Reef genre bulletin board. What started as ocean-themed quickly turned into something attuned to Shark Week in the library. There are just too many adorable shark projects and ideas on Pinterest. I couldn't help myself!

My book selections were good, but I will definitely make some changes for next time around. I absolutely love Down to the Sea with Mr. Magee by Chris Van Dusen, it is a new favorite! The kids loved, loved, loved it!
I think I'm a Shark by Bob Shea is an adorable book for students to read and check out, but it wasn't great for reading aloud. I think next year I'll display it, but not use it in the storytime.
Last came Wave by Suzy Lee. This. Book. Is. Wonderful. I actually really enjoy using wordless books for storytime, the kids always impress me with their level of engagement and focus. The pictures are amazing and the "story" is so sweet. Love this one!

Between books we sang "Five Little Fishies" and used the shark and fish felts (my husband's favorite). All credit for this goes to Jane from Piper Loves the Library! I fell in love with her shark so much, that I had to make one of my own. I love his big-toothed smile and semi-grimacing eyebrow furrow. Like Jane, I mounted him on black felt so that his tail and fins wouldn't be so fragile.
"Five Little Fishies"
(Sung to the tune of Five Little Monkeys Swinging in a Tree)

Five little fishes, swimming in the sea.
Teasing Mr. Shark, "You can't catch me."
Along comes Mr. Shark, as quiet as can be ... and ... Sssnnnnnap!

Four little fishes, swimming in the sea.
Teasing Mr. Shark, "You can't catch me."
Along comes Mr. Shark, as quiet as can be ... and ... Sssnnnnnap!

Three little fishes, swimming in the sea.
Teasing Mr. Shark, "You can't catch me."
Along comes Mr. Shark, as quiet as can be ... and ... Sssnnnnnap!

Two little fishes, swimming in the sea.
Teasing Mr. Shark, "You can't catch me."
Along comes Mr. Shark, as quiet as can be ... and ... Sssnnnnnap!

One little fishie, swimming in the sea.
Teasing Mr. Shark, "You can't catch me."
Along comes Mr. Shark, as quiet as can be ... and ... Sssnnnnnap!

Burp ... I'm full.

Thank you, Jane, this was a wonderful success!!!


Update: Thanks to Shark Week on Discovery Channel, there are a gazillion shark-themed ideas on Pinterest. These are just a few I tried (and loved!):
 Shark Fin Hats, aren't they fun! Pinned by Raquel Hernandez, I was unable to locate the original source. I simply cut strips of blue construction paper, stapled them together and added a fin (with some CHOMP marks). So easy and so fun!
The idea for this darling clothespin shark comes from Estefi Machado. The blog is in Portuguese and while I was able to translate the post through Google, it was still a challenge to understand. So, I took my best guess.
 I did a sketch on white card stock, outlined it with black marker and added some color.
 The fishy is attached with a small section of wooden toothpick, glued to the back of the clothespin.
 Cute and fun!
 Another fast and fun shark craft? The shark clothespin for developing fine motor skills, from Make, Do and Friend. Just paint, glue and play!
 I painted my sharky with blue acrylic paint, added a construction paper fin, and squiggly eyes.
The white paint was tough... I had to clamp the clothespin open in order for it to dry and even then, the teeth stuck together. Still cute.

Up next... I'm debating creating a storytime entirely dedicated to peas. Hmmm, what do you think? You might be asking yourself, "Why peas?" Well, they're healthy, they're green (I'm a fan of doing color-themed storytimes) and peas in a pod are absolutely adorable. Think of the craft possibilities! Pinterest, here I come!

blogger

Friday, August 8, 2014

Dr. Seuss Shirts


Orange Lorax Shirt
Supplies for the Lorax shirt: brown craft fur (I found a panel of the fur in the aisle that has pom-poms and felt sheets), white, black and tan scraps of felt, orange cotton t-shirt and matching colored thread.
Let me just say, this mustache was a huuuuuuuuge pain! The fur was really hard to work with and it took me a few tries. The first time I cut the fur, I was left with a mess and fur everywhere! For the second try, I slid the blade of my scissors under the fur but above the mesh. It worked! It cut the shape, but helped the fur to keep that "scruffy" look. Otherwise, it looks way too manicured. Play with it and you'll get the look you want. But, prepare to be covered in fur.
I stitched the mustache in place and then added the eyes (I forgot to stop and take pictures). Done! Adorably done. And the best part? I got the shirt at Value Village so the entire project cost less than $4!

Blue Truffula Tree Shirt
Supplies for the Truffula Tree shirt: colored craft fur (I bought 1/8 of a yard of each color), non-shiny yellow ribbon, blue cotton t-shirt and matching colored thread.
This is the messy part of the project, prepare to look like you gave a muppet a haircut.
Here are the completed circles.
I cut varying lengths of ribbon and then sewed them onto the shirt. I used a black permanent marker to make them look more authentic. (I don't think the tree tops can withstand being washed, so I'm not worried about what would happen to the tree trunks in the laundry. It will be a special occasion-only shirt).
I did a simple overcast stitch to adhere the tree tops to the shirt, it worked quite well!
The final product, I love!!!

 
Simply Yours Designs: Cute Blog Designs